
What are the tools needed for painting?
When trying the have your first DIY painting project, it is essential for you to know the exact tools you to get your paintings done. When you compare the painting trade to other trades in the world today, you will notice that a painter’s tools are generally simple to procure and not excessively costly. The tools needed to get your interior surfaces done include:
- Painters tape
- Paint brush
- Pot
- Paint tray
- Sugar soap
- Filing blade
- Interior filler
- A dust mask
- Plastic and cloth drop sheets
- Sandpaper (120 – 180 grit)
- Corking gun
- Gap filler
STEPS
- The Clear and Cover Phase
The moment you have acquired all of your tools, then you need to have the space you intend painting cleared out. Take away any breakables from the shelves and tables and ensure the walls are free of any pictures and artworks. For huge items like the sofa or bed, you can just move these items to the middle of the room and ensure to cover it using a plastic drop sheet.
- Wash
Be sure to notice the walls are free of grime and dirt. If otherwise, you will have to make use of the sugar soap to clean and make use of sponge or a clean cloth to give them a snappy wipe down. These sugar soap wipes are an incredible product that is still new on the market. In a case whereby you just want to have one wall painted, this is the most suitable way to follow as it will help you replace having to make use of sugar soap and bucket sponge.
- Fill Blemishes
Check any holes and make use of the filler to fill it up. It is essential that you make use of the right filler. A common mistake of DIY is making use of gaps to fill. Basically, gap filler is difficult to sand and also rubbering and thus, will appear as an imperfection afterwards. Make use of the right filler for the project you are undertaking. After the filler is dry, sand and seal using a product similar to the PSU or 3 in 1.
- Sand, dust
Try to sand the walls with the use of a poll sander, make use of the fine sandpaper or 120 to 180 grits. Ensure the sandpaper is attached to the head of the sanding poll and move it all over and from one, in order for you to systematically conceal the entire surface. At that point, dust down with a rag or broom.
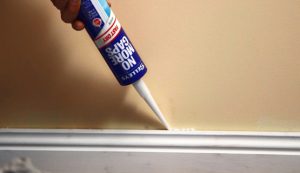
- Gap Cracks
At this point, you will have to fill any gaps existing between your skirting boards, architraves and walls, using the gap filler. You can fill by leading alongside the gap nozel, in doing so, you get the gap filler pushed into the crack. At that point, make use of you’re a damp rag or finger to make a smooth finish.
- Tape
The moment the walls are tidied down or cleaned, you will then have to apply the painter’s tape to your skirting and architraves. For bleeding to be prevented, ensure to keep the tape as close as possible to the corners since it’s possible for you to pat it down significantly in order to prevent wrinkles and bubbles.
TIPS
- You can acquire most of these tools from your neighborhood hardware. In any case, we recommend you to acquire them from your trade center or local paint retail. You will get an incredible painting experience and knowledge at a committed painting store.
- For the floors to be protected against using drop sheets, you can make a choice of using a cloth or plastic. The plastic drop sheets are less expensive and effective, however, they tend to be slippery. The likewise find it difficult to soak up and also paint spilt and can probably simply place it in your shoe in order for it to be walked into a different room. I would suggest making use of a plastic drop sheet and afterward put a cotton one on top of it. When this is done, you will have the best of the two worlds.
- You would assume that there is only an option for tape, however, there are different options. You can select various stickiness levels or various tack levels to accommodate when taping over lately painted surfaces. This is a tape that has an extra lock feature in order for the paint not to bleed under it, getting the edge ruined.
- When deciding on the sandpaper to use, understand that the lower the amount of grit, the more the sandpaper is coarse
As soon as you have completed all of your preparation, it’s high time you started painting your walls.
© Copyright 2017 King Painting Specialists Pty Ltd.
+ There are no comments
Add yours